The Ultimate Guide to 2009 Victory Vegas Low Rear Light Bar Signals
Explore detailed insights on the 2009 Victory Vegas low rear light bar signals to enhance your ride's visibility and style.

- The Ultimate Guide to 2009 Victory Vegas Low Rear Light Bar Signals
- Understanding 2009 Victory Vegas Low Rear Light Bar Signals
- The Ultimate Guide to 2009 Victory Vegas Low Rear Light Bar Signals
- The Ultimate Guide to 2009 Victory Vegas Low Rear Light Bar Signals
- The Ultimate Guide to 2009 Victory Vegas Low Rear Light Bar Signals
- Maintenance Tips and Tricks for Your 2009 Victory Vegas Lighting System
- Frequently Asked Questions about 2009 Victory Vegas Low Rear Light Bar Signals
The Ultimate Guide to 2009 Victory Vegas Low Rear Light Bar Signals
So, you’ve got a 2009 Victory Vegas and you’re looking into those low rear light bar signals, huh? I totally get it! When I first started customizing my own bike, I was like a kid in a candy store. There are so many options out there, and honestly, it can be overwhelming. But don’t worry; I've been through the wringer with this one and I'm here to share what I've learned.
Why Upgrade Your Signals?
First off, let’s talk about why you might want to upgrade your rear light signals. For me, it's all about visibility. Those stock lights might not be bright enough for everyone out there on the road—especially at night or in bad weather. You want other drivers to see you coming from a mile away! Plus, upgrading those lights can really give your bike that sleek look that screams “I’m serious about riding.”
Choosing the Right Light Bar
Now onto the fun part: choosing the right low rear light bar signals for your 2009 Victory Vegas! When I was shopping around, it felt like navigating through a maze of choices. Do I go LED? Incandescent? There are pros and cons to each type.
- LEDs : They’re brighter and last longer than traditional bulbs. Plus, they consume less power – which is always nice.
- Incandescent : These classic bulbs may not be as flashy but offer warmth in their glow and have that old-school vibe.
Just remember—whatever style you choose should complement your bike's aesthetics!
Installation Tips
Okay friends, here's where my first mistake comes into play—I didn’t read the instructions carefully when installing mine! Ugh! So let me save you some trouble: take your time with this process.
-
Gather Your Tools : You’ll need basic tools like screwdrivers and possibly wire strippers if you're doing any splicing.
-
Disconnect the Battery : Seriously guys; safety first! Disconnecting prevents any electrical shorts while you're working.
-
Follow Instructions Carefully : Every model can differ slightly unless they're designed specifically for yours (which is super helpful). If something doesn’t fit right away—don’t force it!
-
Test Before Sealing It All Up : This is crucial because nobody wants to discover their new lights aren’t working after they've put everything back together.
And trust me on this one—I’ve learned from experience!
Maintenance Tips
Once you've got everything installed perfectly (and hopefully without tears), don't forget about maintenance! Keeping an eye on those wiring connections can save you future headaches down the line:
- Regularly check for corrosion or fraying wires.
- Make sure all screws are tightened; vibrations from riding can loosen them up over time.
Also worth mentioning is how easy it is to replace bulbs if you're using incandescent ones—you just pop 'em out when they burn out!
Final Thoughts
Personalizing my ride has been such a rewarding journey—and getting those 2009 Victory Vegas low rear light bar signals just right made such a difference in both visibility and style for my motorcycle adventures! Remember though—the right gear doesn't only make us look good but keeps us safe too.
If you've got questions or favorite upgrades of your own regarding these signal lights—or anything else related—drop them below! Let's keep our rides fun AND safe together!
Understanding 2009 Victory Vegas Low Rear Light Bar Signals
When it comes to riding a motorcycle, safety is key. One of the most crucial aspects of staying safe on the road is ensuring you have proper visibility. This brings us to the 2009 Victory Vegas low rear light bar signals. These lights aren’t just for show; they play a vital role in making sure other drivers see you.
What are Low Rear Light Bars?
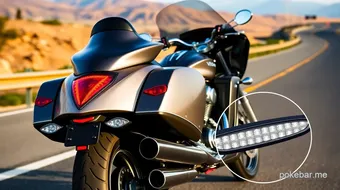
Low rear light bars are sleek lighting fixtures mounted at the back of your motorcycle, specifically designed for models like the 2009 Victory Vegas. They typically integrate brake lights and turn signals into one stylish piece. I remember when I first got my hands on my Victory—those low rear light bars were one of the first upgrades I made! They not only give your bike that polished look but also serve as an essential safety feature.
You might be wondering about installation—believe me, it can seem daunting at first! But with some patience (and maybe a few cups of coffee), you can do it yourself without breaking the bank or spending hours at a shop. Just make sure to follow guidelines closely; there's nothing worse than facing issues because you rushed through it.
Importance of Visibility for Your Motorcycle
Let’s get real here: being visible on the road is everything when you're riding a motorcycle. Those low rear light bar signals help catch attention, especially in dim lighting or during bad weather conditions. They’re powerful little lights that can literally save your life by alerting drivers behind you when you're stopping or turning.
I recall this one ride where I was caught in unexpected rain—it was like someone dumped a bucket over me! Having those bright signals made all the difference as cars whizzed by without much care for visibility around them. It gave me peace of mind knowing that they could clearly see my intentions.
So if you own a 2009 Victory Vegas and haven’t yet upgraded those rear lights, seriously consider doing so! Not only will you enhance your bike’s aesthetics, but you'll also boost its overall safety features too—and who doesn’t want that?
The Ultimate Guide to 2009 Victory Vegas Low Rear Light Bar Signals
Upgrading the signal lights on your 2009 Victory Vegas can be a game changer. I mean, who doesn’t want their ride to look and perform its best? Trust me, I've been there—staring at my bike thinking about how to give it some flair while also making it safer. So let’s dive into the benefits!
Enhanced Safety Features
First off, safety is key! Upgrading your rear light bar signals can make a big difference when you're out on the road. I remember one late night ride where visibility was just... not great. It was like riding in a black hole! With improved signals, you’ll catch other drivers' attention better, especially during those dusk or dawn rides.
Better lighting means clearer communication with fellow road users—like letting them know you’re stopping or changing lanes. Plus, modern LED lights are brighter and last longer than traditional bulbs. After swapping mine for LEDs last summer, I felt like I’d flipped a switch (literally) on my safety game.
Improved Aesthetics and Style
Now let’s talk looks because we all know that style matters too! When I upgraded my signal lights to a sleek low rear light bar design for my 2009 Victory Vegas, it completely transformed the vibe of my bike. Like wow; it felt like giving her a fresh coat of paint!
These new signals add that custom touch that makes your ride stand out in a crowd—or at least that’s what my friends say! They really help highlight the lines of the bike without being too flashy or over-the-top. And let’s be honest here: everyone wants to look good while cruising down Main Street or hitting up bike nights.
Plus, many aftermarket options come in various styles and finishes so you can match them perfectly with your overall theme—whether you're going for classic chrome or something sportier. Just keep an eye on those details; they matter more than we think!
In summary, upgrading your 2009 Victory Vegas low rear light bar signals isn’t just about functionality—it’s also about bringing out personality and improving safety while riding around town (or wherever life takes you). So go ahead and treat yourself; your bike will thank you later!
The Ultimate Guide to 2009 Victory Vegas Low Rear Light Bar Signals
When it comes to upgrading your ride, the 2009 Victory Vegas is a beauty that deserves some attention. One of the coolest upgrades you can make is adding low rear light bar signals. They not only enhance visibility but also give your bike that sleek look. Let’s dive into the installation process for these bad boys!
Tools You Will Need
Before diving into the nitty-gritty, let me tell you – having the right tools makes all the difference! Trust me, I learned this the hard way when I tried using a butter knife instead of a proper screwdriver once (don’t ask). Here’s what you'll need for your installation:
- Socket Set : A good set will save you time and frustration.
- Screwdrivers : Both flathead and Phillips are essential.
- Wire Strippers : You'll be dealing with some wiring, and these babies will help.
- Electrical Tape : Just in case any wires decide to misbehave or fray.
- Pliers : Handy for those stubborn connectors.
- Torque Wrench : To ensure everything's snug without over-tightening.
Got everything? Awesome! Let’s get started.
Step-by-Step Installation Guide
Okay, so here we go! This part might seem daunting if you're new to bike mods, but take it slow and enjoy the process.
-
Prep Your Bike : First things first—safety gear on! Disconnect your battery before doing anything else. It’s like putting on an apron before cooking; trust me—it saves you from shocks (literally).
-
Remove Old Lights : Using your socket set, carefully remove any existing tail lights or signal lights from their mounts. Keep track of screws—you don’t want to be digging through toolboxes later looking for that one tiny screw!
-
Fit Your New Signal Bar : Place your new low rear light bar signals where they’ll live forever—or until you decide to swap them out again! Make sure they align properly with existing mounts.
-
Wiring Time : This is where my wire strippers come in handy—gently strip off about half an inch of insulation from each wire end (twice!). Connect like colors together—red with red and black with black (unless you're feeling adventurous…just kidding!).
-
Secure Everything Down : Use electrical tape to secure connections and ensure nothing shorts out while cruising down those gorgeous backroads.
-
Reconnect Battery & Test Lights : Before buttoning everything up completely, reconnect your battery and test those shiny new signals! If they flash bright as stars on a clear night, congratulations—you've done it!
-
Final Touches & Clean-Up Tighten all screws using that torque wrench for peace of mind—nobody wants their lights falling off mid-ride! And don’t forget to clean up afterward; nobody likes stepping on stray screws in their garage.
And there you have it—a comprehensive guide on installing 2009 Victory Vegas low rear light bar signals! Don’t rush; take pride in each step because every little detail counts when customizing your ride.
So what are you waiting for? Get out there and let those lights shine bright while turning heads wherever you go! Happy riding!
The Ultimate Guide to 2009 Victory Vegas Low Rear Light Bar Signals
When it comes to customizing your ride, the 2009 Victory Vegas low rear light bar signals are an essential upgrade that not only enhances visibility but also adds a touch of style. I remember when I first got my hands on one of these bad boys; it felt like my bike was transformed overnight. There’s something about those sleek lines and bright lights that just makes you feel good cruising down the road.
Top Aftermarket Products Review and Comparison: 2009 Victory Vegas Low Rear Light Bar Signals
So, let’s dive right into some of the best options out there for upgrading your signals! Whether you're looking for LEDs or sticking with incandescent bulbs, I've gathered some top-notch products that really stand out.
Best Signal Lights for Bikes (Including LED vs Incandescent)
First up, we’ve got the classic debate: LED vs incandescent. Honestly, I’ve tried both types on my own bike over the years. LEDs tend to last longer and use less power—plus they’re super bright! But there's still something nostalgic about good old incandescent lights that can’t be beaten.
Here’s a quick rundown before we get into specifics:
- LEDs : Bright, energy-efficient, and durable.
- Incandescents : Affordable and give off a warmer glow but burn out quicker.
Now let's check out some specific products!
Product Comparison Table: Features, Prices, and Ratings
| Product Name | Type | Brightness (Lumens) | Price | Rating |
|---|---|---|---|---|
| Kuryakyn 5455 | LED | 1200 | $129.99 | ★★★★☆ |
| Custom Dynamics Dual Function | LED | 900 | $99.99 | ★★★★★ |
| Drag Specialties Signal Kit | Incandescent | 600 | $65.00 | ★★★☆☆ |
| VicBaggers Integrated Tail Light | LED | N/A | $169.95 | ★★★★★ |
As you can see from this table—shout-out to late-night research sessions—I found each product has its pros and cons depending on what you need.
For instance, if you're after brightness without breaking the bank, I'd highly recommend checking out Custom Dynamics' Dual Function lights—they're super easy to install too!
In contrast—and here’s where things get tricky—the Drag Specialties option may save you money initially but might require more frequent replacements due to those pesky burnt-out bulbs (been there!).
Final Thoughts
Upgrading your 2009 Victory Vegas low rear light bar signals is definitely worth considering if safety and aesthetics are high on your list. Always remember that while price is important; functionality matters even more in keeping us safe on those long rides.
So whether you're team LED or team Incandescent—or somewhere in between—there's no shortage of options available! Just make sure to do a little homework before committing so you don't end up with buyer's remorse like I did once!
Happy riding!
Maintenance Tips and Tricks for Your 2009 Victory Vegas Lighting System
Taking care of your 2009 Victory Vegas low rear light bar signals is a must for any proud rider. Trust me, I’ve been there, cruising down the road when suddenly the lights flicker or worse—go out completely! It's like riding with a missing piece of my soul. So, let's dive into some tips that’ll keep your lighting game strong.
How to Maintain Your Newly Installed Light Bar
First things first, if you’ve just added that snazzy light bar, congratulations! But don’t let excitement cloud your maintenance efforts. Regular checks are key. Start by inspecting the wiring every few weeks; make sure everything feels snug and secure. Loose connections can cause all sorts of headaches—trust me on this one!
Also, give those bulbs a quick look-over now and then. I learned the hard way that waiting until they burn out is not fun at all (hello darkness!). If you notice them dimming or flickering, replace them before it becomes an issue on the road.
Lastly, don’t forget about cleaning! A little soap and water go a long way in keeping your lights bright and visible. Just avoid harsh chemicals; they can be more damaging than helpful.
Troubleshooting Common Issues with Motorcycle Electrical Systems
Now let’s tackle troubleshooting because we all know how frustrating electrical issues can be! One day you're cruising along in style, then bam—your signals decide to throw a tantrum.
If your 2009 Victory Vegas low rear light bar signals aren’t working right (or not at all), check the fuse box first! It sounds simple but you'd be surprised how often this solves problems quickly. Replace any blown fuses—you might want to keep some spares handy in your toolkit (I learned this tip from my buddy who always seems to have backup parts).
Next up is testing your battery connections; loose wires here can lead to major drama later on down the ride path (and trust me; it’s no fun having to push-start). Use a multimeter if you have one lying around—it makes checking voltages smooth sailing.
Remember: patience is key when dealing with electrical systems! If something doesn’t seem right after following these steps—or heck even if it does—it might be time for a pro inspection.
In summary? Keeping those 2009 victory vegas low rear light bar signals shining bright requires regular maintenance and being proactive about potential issues. Happy riding folks—and may your lights always stay lit!
Frequently Asked Questions about 2009 Victory Vegas Low Rear Light Bar Signals
What are the top-rated rear light bars available for the 2009 Victory Vegas?
When it comes to picking out a good rear light bar for your 2009 Victory Vegas, there are a few that always pop up on recommendation lists. Personally, I’ve tried a couple of them myself! The Kuryakyn LED Light Bar is one of my all-time favorites. It’s sleek, super bright, and really gives off that old-school vibe while being incredibly modern at the same time.
Another great option is the Victory Accessories Rear Light Bar . I remember when I installed this one; it was like giving my bike an instant facelift! Not only does it look fabulous but also enhances visibility during night rides—trust me, you want that extra safety feature!
And don't forget to check user reviews online before making your decision; they can save you from some not-so-great purchases (I learned this the hard way with one dim bar). Everyone has their own preferences when it comes to style and brightness levels.
How do I wire a low rear light bar on my bike?
Wiring up a low rear light bar on your 2009 Victory Vegas might seem daunting at first—believe me, I've been there! But once you dive in, it's actually pretty straightforward. First things first: make sure you have all your tools ready. You’ll need basic hand tools like screwdrivers and pliers.
Start by disconnecting the battery—I know we’re all eager to get going but trust me here; safety first! Then, remove any existing tail lights if you're replacing them. Next comes figuring out where each wire goes—this part took me way longer than expected because I kept second-guessing myself!
It's usually helpful to refer to your bike's wiring diagram as well. Once you've connected everything securely (double-check those connections!), reattach the battery and give it a test run before sealing everything back up.
Oh! And don’t be like me—I got so excited after wiring mine that I forgot to secure some screws properly...yeah, had to redo that later on. So take your time—it’s worth getting right!
Follow these steps carefully and soon enough you'll be riding around with those snazzy new signals lighting up behind you!
Previous article: Discover the Essentials of Bar Foot Rails
Next article: 400mm Offset T Bar Pull Handle Review
The Ultimate Guide to 2009 Victory Vegas Low Rear Light Bar Signals: Share, Rating and Comments
0.0 / 5
0 Review