The Complete Guide to Choosing and Installing Your Perfect Bar Foot Rail
Explore everything you need to know about bar foot rails for your home or commercial space. Enhance comfort and style with our guide!
md
- Introduction to Bar Foot Rails
- Why You Need a Bar Foot Rail
- Choosing the Right Material
- Measuring Your Space
- Installation Steps Made Easy
- Final Touches
- Understanding the Importance of Bar Foot Rails
- The Complete Guide to Choosing and Installing Your Perfect Bar Foot Rail
- Step-by-Step Installation Guide for Your Bar Foot Rail
- The Complete Guide to Choosing and Installing Your Perfect Bar Foot Rail
- Tips on Maintaining Your Bar Foot Rail Over Time
- Frequently Asked Questions About Bar Foot Rails
Introduction to Bar Foot Rails
Hey there! So, if you’re looking to jazz up your home bar or even that cozy corner in your kitchen, a bar foot rail could be just the thing. I remember the first time I saw one—it was at this trendy pub downtown. My friends and I were lounging, and my feet found this lovely little rail just below the counter. It made me feel so comfortable! That’s when I thought about adding one to my own space.
Why You Need a Bar Foot Rail
Now, you might be wondering—why is a bar foot rail such a big deal? Well, apart from being super stylish (trust me on this), they provide support for your legs while standing. Think about it: after a long day at work, who wants their feet aching like they’ve run a marathon? Not me! A good foot rail can make all the difference in how relaxed you feel while sipping on your favorite cocktail or craft brew.
Choosing the Right Material
When it comes to choosing materials for your bar foot rail, you'll come across options like brass, stainless steel, and wood. Each has its vibes and perks! For instance:
- Brass gives that classic look but does need some polishing.
- Stainless Steel is modern and super easy to clean.
- Wood offers warmth but might require more maintenance.
I went with stainless steel in my own setup because let’s be real—I’m not great with upkeep!
Measuring Your Space
Before diving into installation (which I'll get into soon!), measuring is key. You wouldn’t want something too short or ridiculously long sticking out awkwardly under your bar top. Take note of how high your counter sits—standard heights are usually around 40 inches—but measure twice just to be sure! Trust me; I learned this lesson after buying an entire set of equipment only for it not to fit right…
Installation Steps Made Easy
Alrighty then! Let’s talk about putting that beautiful bar foot rail in place. Here’s what worked best for me:
-
Gather Your Tools: You’ll need brackets (make sure they're sturdy), screws, and maybe even some adhesive if you're feeling fancy.
-
Mark Positions: Use a pencil to mark where each bracket will go along the bottom of your bar.
-
Drill Pilot Holes: This helps prevent any splintering or cracking—always good!
-
Attach Brackets First: Secure those bad boys before placing the actual railing.
-
Slide On The Rail: Finally, attach the foot rail onto those brackets.
Don't rush through this part; taking your time means fewer mistakes!
Final Touches
Once installed—and believe me when I say seeing it come together is such an achievement—you can add personal touches like LED strip lights underneath or decorative elements around it! I've even seen folks paint theirs according to their room's theme; creativity galore!
In closing here—having a solid yet stylish bar foot rail can totally elevate both comfort and aesthetics in any space you choose to put it in. Happy decorating!
Understanding the Importance of Bar Foot Rails
Alright, let’s dive into why bar foot rails are a big deal. You might think, “Isn't it just some metal strip?” But trust me, it’s much more than that! When I first got my bar set up at home (after weeks of planning and Pinterest browsing), I underestimated how much a bar foot rail would change the vibe.
For starters, they provide comfort for your guests. Imagine this: after a long day at work, you kick back with friends over drinks—everyone's standing around chatting and laughing. If there’s no place to rest those tired feet? Well, people tend to get fidgety or even cranky! A good foot rail gives everyone something to lean on or rest their feet against. It's all about creating a cozy space where folks can unwind.
And then there’s the style factor. Oh boy! There are so many options out there! Whether you're going for rustic charm or sleek modern vibes, finding the right bar foot rail can really tie everything together. I remember scrolling through endless styles online before finally picking one that matched my handmade wooden bar—the satisfaction was real!
Plus, they help protect your flooring from scuff marks and scratches—thank goodness for that! I mean, have you ever tried scrubbing away those pesky shoe prints? Ughhh...it's not fun at all. By having a sturdy foot rail in place, you’re saving yourself some future headaches.
So yeah, if you're considering sprucing up your home bar (or any kind of space with seating), don't overlook the importance of these little gems called bar foot rails! They make gatherings more comfy while also adding character to your setup—a total win-win in my book!
The Complete Guide to Choosing and Installing Your Perfect Bar Foot Rail
When it comes to adding that final touch to your home bar, a bar foot rail can really elevate the whole vibe. It not only looks great but also provides comfort for those long nights of entertaining friends or just chilling with a drink after a long day. So, let’s dive into the different types of materials used in bar foot rails because trust me, it makes a difference!
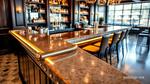
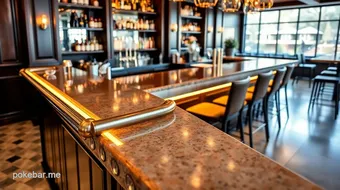
Stainless Steel Foot Rail
Stainless steel is like the rockstar of bar foot rails! It's super durable and adds that sleek, modern look—perfect for any contemporary setting. I remember when I first installed one at my home bar; it felt like I was stepping into my favorite pub every time I walked in. The shiny finish is easy to clean too, which is a big win if you tend to spill drinks (guilty as charged!). Just be cautious about fingerprints; they show up more than you'd think!
A tip? Make sure you choose high-quality stainless steel; some lower grades can rust over time, especially if your bar gets damp. You don’t want to ruin that beautiful look you worked so hard on.
Wooden Bar Footrest
Now, if you're going for that cozy, rustic feel in your space, wooden footrests are absolutely charming! They add warmth and character—seriously, who doesn’t love the smell of fresh wood? My best friend opted for reclaimed wood for her kitchen island's foot rail—the unique grains and colors make each piece special.
One thing I've learned from personal experience: wood requires maintenance! It can scratch easily and may need refinishing now and then. But honestly? The effort pays off when guests admire its beauty while resting their feet on it during game night.
If you're considering this option, try choosing hardwood like oak or maple—they're more durable than softer woods like pine.
Adjustable Height Foot Rail
For those who want versatility—enter adjustable height foot rails! This type is perfect if your family has varying heights (or if you've got kids who might outgrow their chairs every few months). They’re great for accommodating everyone comfortably at your bar height table or countertop.
I once attended a party where the host had an adjustable rail installed—it was such a hit! People were able to customize their seating arrangements without feeling cramped or awkward. Plus, these usually come with cool features like locking mechanisms which ensure safety while using them.
Just keep in mind that installation might be slightly more complex compared to fixed options. But hey—I promise it's worth the extra effort!
In conclusion (not trying to sound formal here!), picking out the right material for your bar foot rail really sets the tone for how functional and stylish your space will be. Whether you go stainless steel for modern elegance or wooden charm—or even something adjustable—you’ll find joy knowing you've made an informed choice tailored just right for you! Happy decorating!
Step-by-Step Installation Guide for Your Bar Foot Rail
Installing a bar foot rail can seem daunting, but trust me, it's more straightforward than it looks! I remember the first time I tried to install one. I had visions of grandeur and ended up with a crooked rail that made my friends chuckle. So, here’s how to avoid my mistakes and get your bar foot rail installed perfectly.
1. Gather Your Tools and Materials
First things first, you’ll need the right tools. Grab a tape measure, level, drill (or screwdriver if you're feeling old-school), screws or brackets (depending on your design), and maybe a pencil for marking – you know, just in case. Oh! And don’t forget the actual bar foot rail itself!
2. Measure Twice, Cut Once
This might sound like an old saying from my granddad, but it’s so true! Start by measuring where you want to position your bar foot rail. Typically, it should be around 6-8 inches above the floor – just enough for everyone to rest their feet comfortably without kicking anything over.
I once measured only once because I was super excited... let’s just say that didn’t end well!
3. Mark Your Spot
Once you have those measurements down pat—use a pencil to mark where each bracket will go along the wall or base of your bar. Make sure everything is straight; use that trusty level of yours!
If you’re installing on uneven surfaces (which is common with older homes), consider using shims or adjusting your brackets accordingly.
4. Pre-drill Holes
Now comes the fun part: drilling! Use your drill to create holes at the marked spots for screws—this makes installation smoother and helps prevent any wood from splitting (which happened during my first attempt… yikes!).
5. Attach Brackets Securely
Next up is attaching those brackets firmly in place with screws—you want this thing sturdy since it'll bear some weight when guests kick back after a long day.
Make sure everything feels tight; nobody wants their fancy new footrail wobbling underfoot!
6. Install Your Bar Foot Rail
Finally, slide that beautiful bar foot rail into place over those brackets you've secured earlier—it should fit snugly without too much hassle!
Use extra screws if needed depending on how many support points you've got along its length—better safe than sorry!
Wrapping It Up
And there we go – easy peasy lemon squeezy! Just step back now and admire your handiwork while envisioning all those good times ahead with friends gathered around sipping cocktails (or whatever floats yer boat!). Just remember: take it slow and don’t rush through these steps like I did during my early attempts at DIY projects.
So whether you're jazzing up home bars or adding flair to commercial spaces—a well-installed bar foot rail can elevate any space beautifully! Cheers to that!
The Complete Guide to Choosing and Installing Your Perfect Bar Foot Rail
When it comes to creating the ultimate bar or kitchen island experience in your home, a bar foot rail is often an overlooked yet essential detail. It adds comfort while you’re sitting at the bar and can really enhance the overall aesthetic of your space. But before you dive into picking out that perfect piece, let’s talk about what you need to consider regarding market rates and price factors.
Current Market Rates & Price Factors Explained for Bar Foot Rails
So, prices for bar foot rails can vary quite a bit depending on various factors like materials used, design complexity, and even brand reputation. I remember when I first started looking—I was shocked! You could find basic metal options starting around $30 per linear foot but then saw some fancy wood ones going for over $100!
The material plays a huge role in cost. Stainless steel is durable and looks sleek but might set you back more than aluminum or plastic options. Also, if you're eyeing custom designs or finishes, be prepared to pay a premium. And don't forget—installation costs! If you're not handy with tools (like me), hiring someone could add another hundred bucks on top of everything.
Best Bar Foot Rails: Comparing Costs and Features
Now that we have an idea about pricing let's compare some popular styles available on the market today!
-
Stainless Steel : These beauties are perfect for modern bars—super durable and easy to clean! Expect to spend anywhere from $40-$80 per linear foot.
-
Aluminum : A lighter option that's typically cheaper; these start around $30 per linear foot but may lack that robust feel.
-
Wooden Rails : Ahh...the classic look! Depending on the type of wood (think oak vs pine), prices can range from $50 all the way up past $150 per linear foot if you're opting for something high-end.
I once went for a wooden rail thinking it would give my kitchen island that warm vibe—but man, upkeep was no joke! Every few months I had to buff it up with oil; otherwise, it looked sadder than my last attempt at baking bread!
Affordable Options for Custom Length Kitchen Island Foot Rails
If you're working with specific dimensions—say your kitchen island is an odd shape—you might want custom lengths without breaking the bank. Thankfully there are affordable options out there!
Many online retailers offer customizable lengths where you only pay for what you need instead of buying standard pre-cut sections which could leave you with excess material—and trust me; nobody needs more clutter floating around their kitchen!
Another tip? Check local hardware stores—they sometimes carry discounted off-cuts or remnants of higher-quality materials just waiting to be snagged at half price! Just last month I found exactly what I needed by rummaging through their clearance section—it felt like finding treasure!
In summary, choosing and installing your perfect bar foot rail doesn’t have to be overwhelming—or super expensive either! With careful consideration of materials and styles plus keeping an eye out for deals—you'll totally nail this project while making your space look fab!
Tips on Maintaining Your Bar Foot Rail Over Time
So, you've finally installed your bar foot rail, and it looks fabulous! Trust me, I know how much effort goes into picking the right one and making sure it fits perfectly. But let's face it—if you want that beauty to last, some maintenance is necessary. Here are a few tips I've picked up along the way from my own experiences (and a couple of mistakes!).
First off, regular cleaning is key. I learned this the hard way after letting some spilled drink residue sit for too long. Yikes! A simple mixture of warm water and mild soap usually does wonders—not too harsh but effective enough to keep things shiny. Just grab a soft cloth or sponge; I recommend avoiding anything abrasive.
Next up is checking for loose fittings periodically. You wouldn't want your friends to lean back against a wobbly bar foot rail during happy hour—trust me; it's not pretty! A quick inspection every month can save you some embarrassment down the line. If you notice anything off-kilter, tighten those screws like you're getting ready for battle!
Also, consider applying a sealant if your rail is made from wood or metal exposed to moisture (like in my basement bar!). This helps protect against wear and tear over time; just make sure it's compatible with whatever material you're working with!
Lastly, don’t forget about seasonal checks! Depending on where you live—like here in New England where we get crazy weather—it’s smart to give your foot rail some extra love as temperatures change. It might sound silly but trust me; it makes all the difference.
DIY Footer Projects: Creating a Custom Look
Alrighty friends, let’s dive into something super fun: DIY footer projects for creating that unique bar foot rail look! When I was setting up my home bar area last summer (oh boy—the planning took forever!), I realized how personal touches could transform even the simplest space into something special.
One project that really got my creative juices flowing was customizing my foot rail using reclaimed wood from an old barn nearby (it felt so rustic!). Not only did it add character but also saved me money—a win-win situation if you ask me! You can either sand down and refinish the wood yourself or leave it raw for an authentic vibe.
Another cool idea? Paint or stain your bar foot rail in colors that match your decor better than what you originally chose—or at least what came out of those box store kits ( ahem ). Trust me when I say that painting gives everything a fresh new feel without needing major renovations!
If you're feeling particularly adventurous—and maybe have more time on hand—you could even integrate LED lighting under or around your bar foot rail. Imagine sipping cocktails while basking in colorful light… sounds dreamy right? Just remember to plan out wires carefully so they don’t end up looking messy!
Oh—and here's where I've stumbled before: make sure all tools are handy before starting any project! The last thing you'll want is running around mid-project because “oops” forgot something essential... Yep, been there done that!
In conclusion, maintaining and customizing your bar foot rail doesn't have to be daunting at all—in fact, with these tips and ideas in mind—you’ll create an inviting space perfect for entertaining family and friends while keeping everything nice & tidy over time! Cheers to stunning home bars!
Frequently Asked Questions About Bar Foot Rails
What is the purpose of a bar foot rail?
Ah, the bar foot rail! It's more than just a fancy addition to your home bar or pub. The primary purpose of a bar foot rail is to provide comfort for those who are standing or sitting at the bar. You know that feeling when you’re leaning against a hard surface for too long? Yeah, not great. A foot rail allows you to rest your feet and helps create a cozy atmosphere while enjoying drinks with friends.
Plus, it adds style! With various materials and designs available, choosing the right one can really elevate your space. So whether you're hosting game nights or just kicking back after work, it makes your spot feel more inviting.
How do you measure for a custom-sized bar footrest?
Okay, so here’s where I had my first big “oops” moment while setting up my own home bar. I thought measuring was as simple as grabbing any old tape measure and calling it a day—wrong! First off, you'll want to determine how high your bar is from the ground; most bars sit around 40-42 inches tall.
Next step? Measure how far out from the front edge of your bar you want the foot rail to extend—usually about 6-12 inches works well.
Then comes width...you'll want enough room for everyone’s feet without crowding each other (trust me on this). Once you've got all these numbers down, jot them down clearly—because believe me, you'll forget if you try holding them in your head!
Can I install a bar foot rail myself?
You totally can! Seriously though—I did this myself last summer when I transformed an old garage into my personal speakeasy (yes, I'm that person!). If you're handy with basic tools like drills and screwdrivers—and let’s be honest—the internet has made DIY projects much easier—you should be good to go.
Just make sure you've got some solid instructions handy (there's plenty online) because it's not always smooth sailing. And hey—if things start looking messy or complicated in there…don’t hesitate to call in some reinforcements!
Cost-effective materials for DIY footer rails?
For those of us watching our wallets but still wanting something stylish? You’ve got options! Stainless steel will give you that sleek look but can get pricey. Instead, consider using wood—it’s cost-effective and gives off that warm vibe we all love.
Another good choice could be PVC pipe covered with wrap-around faux wood; it looks great without breaking the bank! Just remember: whatever material you choose should be durable enough to withstand regular use because nobody wants their lovely new setup falling apart after one wild party!
What styles of bars benefit from having a proper footer?
Honestly? Any style can benefit from adding that sweet touch of elegance known as "the footer." But let's break it down by type:
- Modern Bars: Sleek stainless steel rails fit perfectly with clean lines.
- Rustic Bars: Wood accents blend beautifully with farmhouse decor.
- Classic Pubs: Go traditional with brass rails—they scream old-world charm!
- Outdoor Tiki Bars: Fun colors on PVC can add tropical flair.
The bottom line? No matter what kind of vibe you're going for in your space—a well-chosen footer adds both function and personality! So get out there and find yours; it's gonna change everything about hangout time at home!
Previous article: Essential Horse Vaccine Guide for Fall
Next article: Victory Vegas Low Rear Light Bar Signals
The Complete Guide to Choosing and Installing Your Perfect Bar Foot Rail: Share, Rating and Comments
0.0 / 5
0 Review